Every developer I know remembers the exact moment they got their first API response back from a language model. It feels like the first time you saw a terminal print "Hello, World" — except this time, the machine actually understands what you said. If you haven't had that moment yet, today's the day.
This guide cuts through the noise. No fluff, no toy demos that don't translate to real projects. By the end, you'll have a working AI app, a clear mental model of the OpenAI API, and the foundational patterns you need to build anything from a chatbot to an autonomous agent.
What You Actually Need to Get Started
The barrier to entry is lower than you think. Here's the short list:
- An OpenAI platform account with API access
- Python 3.9+ (or Node.js — we'll use Python here)
- The
openaiPython package - A few dollars of API credit (a basic app will cost pennies)
Install the SDK and set your key:
pip install openai
export OPENAI_API_KEY="sk-your-key-here"
Never hardcode your API key. Use environment variables or a secrets manager from day one. This habit will save you from a very bad GitHub push someday.
Understanding the Core Concepts
Models
OpenAI exposes several model families. For most developers starting out in 2026, your decision tree looks like this:
- GPT-4o — Best general-purpose model. Use this for complex reasoning, structured output, and anything user-facing.
- GPT-4o mini — Cheaper, faster, still surprisingly capable. Use for high-volume tasks, classification, or simple completions.
- o3 / o4-mini — Reasoning-optimized models. Use when the problem requires multi-step logic or math.
If you're watching costs closely (and you should be — see our guide on reducing OpenAI API costs without sacrificing quality), start with GPT-4o mini and upgrade only where quality matters.
The Chat Completions API
Almost everything you build will go through the Chat Completions endpoint. It takes a list of messages and returns a response. The message structure has three roles:
- system — Instructions that shape the model's behavior across the whole conversation
- user — Input from the human (or your application)
- assistant — Previous responses from the model (used to maintain conversation history)
Your First API Call
Let's write actual code. Here's the simplest possible call:
from openai import OpenAI

client = OpenAI()  # Reads OPENAI_API_KEY from environment

response = client.chat.completions.create(
    model="gpt-4o-mini",
    messages=[
        {"role": "system", "content": "You are a helpful assistant."},
        {"role": "user", "content": "Explain what an API is in two sentences."}
    ]
)

print(response.choices[0].message.content)
Run it. You'll get a clean, coherent response in under a second. That's the foundation. Everything else is layering on top of this pattern.
Building a Real App: A CLI Research Assistant
Let's build something actually useful — a multi-turn CLI assistant that remembers conversation history. This is the pattern behind every chatbot, every copilot, every conversational interface you'll ever build.
from openai import OpenAI

client = OpenAI()

def run_assistant():
    print("Research Assistant ready. Type 'quit' to exit.\
")

    # System prompt defines the assistant's persona and behavior
    messages = [
        {
            "role": "system",
            "content": (
                "You are a senior research assistant. "
                "Give concise, accurate answers. "
                "When asked to summarize, use bullet points. "
                "Always cite when you're uncertain about a fact."
            )
        }
    ]

    while True:
        user_input = input("You: ").strip()

        if user_input.lower() == "quit":
            print("Goodbye.")
            break

        if not user_input:
            continue

        # Append user message to history
        messages.append({"role": "user", "content": user_input})

        response = client.chat.completions.create(
            model="gpt-4o-mini",
            messages=messages,
            temperature=0.7,
            max_tokens=500
        )

        assistant_message = response.choices[0].message.content

        # Append assistant response to history for next turn
        messages.append({"role": "assistant", "content": assistant_message})

        print(f"\
Assistant: {assistant_message}\
")

if __name__ == "__main__":
    run_assistant()
Notice what's happening with messages: you're building a growing list. Every turn, you add the user's input and the model's response. This is how the model "remembers" — it sees the full conversation history on each call. There's no server-side memory; it's all in the messages array you send.
This also means costs scale with conversation length. In production, you'll want to implement a windowing strategy or use embeddings-based memory. We cover this in depth in our piece on AI agent memory and persistent sandbox infrastructure.
Key Parameters You Need to Understand
temperature
Controls randomness. Range 0–2. Low values (0–0.3) give deterministic, focused output — good for classification, code generation, data extraction. Higher values (0.7–1.2) give more creative, varied responses — good for brainstorming, writing, ideation. Most production apps live between 0.2 and 0.8.
max_tokens
Caps the response length. One token ≈ 4 characters in English. Set this deliberately — an uncapped response on a complex prompt can run up costs fast. For a conversational interface, 300–600 is usually plenty.
response_format
When you need structured output — and in real apps, you almost always do — use JSON mode:
response = client.chat.completions.create(
    model="gpt-4o-mini",
    messages=[
        {"role": "system", "content": "Extract the following fields as JSON: name, email, company."},
        {"role": "user", "content": "Hi, I'm Sarah Chen from Acme Corp. Reach me at sarah@acme.io"}
    ],
    response_format={"type": "json_object"}
)

import json
data = json.loads(response.choices[0].message.content)
print(data)  # {'name': 'Sarah Chen', 'email': 'sarah@acme.io', 'company': 'Acme Corp'}
Structured output is the bridge between natural language and your application's data layer. Master this early.
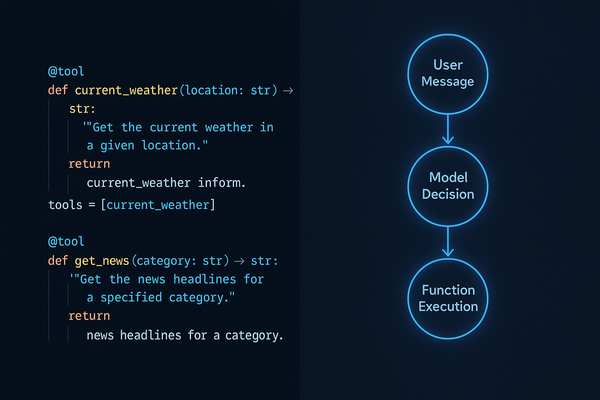
Adding Function Calling
Function calling is where things get powerful. You define tools the model can call, and it decides when to use them based on the conversation. This is how you connect the model to real-world actions: database queries, API calls, file operations.
tools = [
    {
        "type": "function",
        "function": {
            "name": "get_weather",
            "description": "Get the current weather for a given city",
            "parameters": {
                "type": "object",
                "properties": {
                    "city": {
                        "type": "string",
                        "description": "The city name, e.g. 'San Francisco'"
                    }
                },
                "required": ["city"]
            }
        }
    }
]

response = client.chat.completions.create(
    model="gpt-4o-mini",
    messages=[{"role": "user", "content": "What's the weather in Tokyo?"}],
    tools=tools,
    tool_choice="auto"
)

# Check if model wants to call a function
if response.choices[0].finish_reason == "tool_calls":
    tool_call = response.choices[0].message.tool_calls[0]
    print(f"Model wants to call: {tool_call.function.name}")
    print(f"With args: {tool_call.function.arguments}")
For a complete deep-dive on this pattern including the full tool-call loop, check out our GPT-4 function calling practical developer guide.
Streaming Responses
For any user-facing application, you want streaming. It makes your app feel dramatically more responsive — users see tokens appear in real-time rather than waiting for the full response.
stream = client.chat.completions.create(
    model="gpt-4o-mini",
    messages=[{"role": "user", "content": "Write a short product description for a noise-cancelling headset."}],
    stream=True
)

for chunk in stream:
    if chunk.choices[0].delta.content is not None:
        print(chunk.choices[0].delta.content, end="", flush=True)

print()  # Final newline
One line change, completely different user experience. We have a full breakdown of streaming patterns for production apps in our article on streaming LLM responses for real-time AI apps.
Error Handling You Can't Skip
Production code needs resilience. The OpenAI API will occasionally rate-limit you, time out, or return errors. Handle them properly from the start:
from openai import OpenAI, RateLimitError, APITimeoutError, APIConnectionError
import time

client = OpenAI()

def call_with_retry(messages, max_retries=3):
    for attempt in range(max_retries):
        try:
            response = client.chat.completions.create(
                model="gpt-4o-mini",
                messages=messages,
                timeout=30
            )
            return response.choices[0].message.content

        except RateLimitError:
            wait = 2 ** attempt  # Exponential backoff
            print(f"Rate limited. Waiting {wait}s...")
            time.sleep(wait)

        except APITimeoutError:
            print(f"Timeout on attempt {attempt + 1}")
            if attempt == max_retries - 1:
                raise

        except APIConnectionError as e:
            print(f"Connection error: {e}")
            raise

    raise Exception("Max retries exceeded")
What to Build Next
You have the foundation. Here's how to level up from here:
- Add retrieval — Connect the model to your own data with embeddings and vector search. Start with our guide on building a RAG system with LangChain and OpenAI.
- Build agents — Chain function calls together so the model can complete multi-step tasks autonomously.
- Add a web interface — FastAPI + WebSockets pairs perfectly with streaming completions.
- Structured pipelines — Move beyond single prompts into multi-step workflows with validation at each stage.
Practical Takeaways
- Start with
gpt-4o-minifor cost efficiency; upgrade to GPT-4o where quality demands it - The messages array is your memory — manage its growth deliberately in production
- Use
response_format: json_objectwhenever you need structured output in your app - Stream responses for any user-facing interface — it's one parameter and transforms UX
- Implement exponential backoff retry logic before you ship anything
- Your system prompt is the most important piece of engineering in your app — invest in it
The OpenAI API is genuinely one of the most well-designed developer APIs out there. The primitives are simple, the documentation is solid, and the upgrade path from toy project to production system is clearer than most. You now have everything you need to build the first version of something real. Ship it.